Monday, April 25, 2011

How to Not Mount Things on Your Workbench

When I made my first workbench, I bolted my grinder to one of the front corners and my mechanic's vise to the other. You know, where they'd be handy. Well, they were handy enough, but they were also in the way a lot of the time.

So when I made my second workbench, I mounted both the grinder and the vise on some little wooden platforms instead of directly to the workbench. That way, I can clamp them to the bench when I need them, and put them elsewhere when I don't.


The funny notches in the platforms make it so "elsewhere" usually means hanging from French cleats on the shop wall.


Saturday, April 23, 2011

How to Flatten a Cutting Board

December 22, 2006. That's the day when Marc Spagnuolo published A Cut Above, the Wood Whisperer podcast episode that transformed the end-grain cutting board from a utilitarian kitchen accessory to a near rite of passage among fledgling woodworkers everywhere.


In the video, Marc shows how to keep the boards aligned during the glue-up to minimize the need for sanding later. But if your pieces aren't cut exactly right, or if one of them slips without being noticed during the final glue-up, it's entirely possible to end up with a cutting board that's needs to be flattened before you can finish it.

Your first thought at this point might be, "I'll just run the board through my planer." That sounds like a reasonable idea, but DON'T DO IT! Planers don't like to plane end grain. Even with extreme care, there's a really good chance that you'll destroy the board, and maybe the planer as well.

So what to do? If you have a thickness sander (or access to one), that's the way to go. If you don't, you might have success with a hand-held belt sander or with hand planes. However, it takes some finesse to get a board flat with a belt sander, and it's not especially easy to use a hand plane on end grain.

In the absence of a thickness sander, another option is to use a router and a jig. This setup is really neat, even though it would certainly be overkill for a little cutting board. This one is similar, but scaled down a bit for smaller boards. Both of these jigs (and many others) rely on some sort of straight rail system to guide the router.

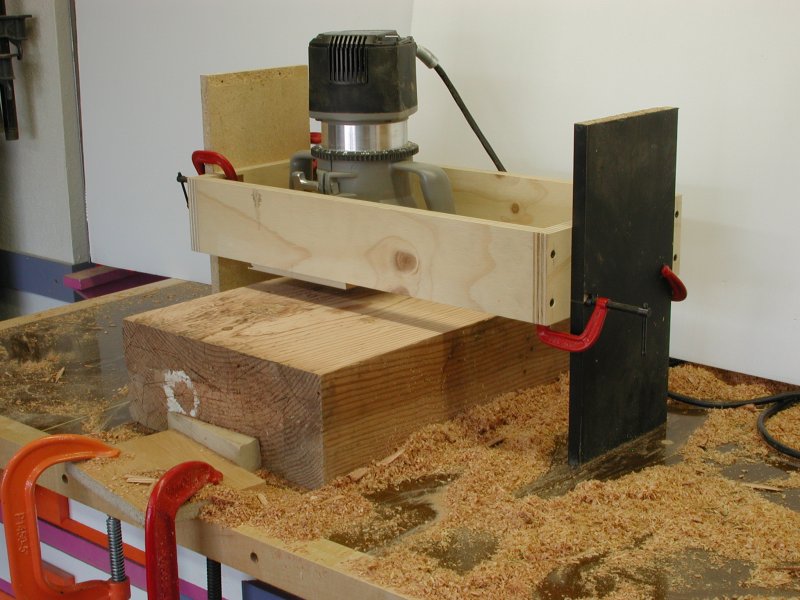
It occurred to me that a flattening jig might use the surface of a workbench or assembly table as a reference, instead of having rails built into the jig. With that idea in mind, I came up with this very simple jig:


It acts as a bridge, suspending the router a fixed distance above the workbench. To use it, I secured the workpiece to the workbench, and then just slid the jig around on the workbench to flatten the board. I didn't have a cutting board to try it out on, so I used a big block of fir that I had laying around instead.

I got some burn marks that started after the cheap HSS router bit I was using got dull when I went through a big knot. I don't think you would get this burning with a decent, sharp carbide bit in clear lumber.

For this experiment, I just clamped the legs on either end of the jig to raise it above my big thick block. For most applications, where the workpiece would typically be an inch or two thick, you could attach the legs permanently and then tweak the router itself for small vertical adjustments.

I mounted the router a third of the way from one end of the jig. With this arrangement, if you plane the right half of the board with the router oriented towards the right, then turn the jig around the other way to do the left half, you can plane boards that are 2/3 as wide as the jig is long. If you mount the router in the middle of the jig, there's no need to turn the jig around, but you'll be more limited in the width of boards that you can flatten.

Saturday, April 16, 2011

Mess-Free Varnish Applicator Pads

I'm a big fan of the Wood Whisperer DVD where Marc Spagnuolo explains his wiping varnish technique.  If I remember correctly, Marc suggests old T-shirts as the material of choice for making the applicator pads.  Well, I'm still wearing my old T-shirts, thank you very much, so I decided to try paper towels instead.

I was a little bit worried that the paper towels would fall apart fairly quickly and leave fuzz and lint in the finish.  As luck would have it, though, they didn't.  A lot of that probably has to do with the brand (Bounty) that I'm using.  For the record, I haven't tried any other brands to see if they might be better or worse.

The Bounty towels come in sheets that are 11" long and 6" wide.  I stack two of these sheets on top of each other, then fold them in half twice the long way to make a pad that's 6" long and 2-3/4" wide.  Then I fold that in half twice the other way so the end result is 2-3/4" long, 1-1/2" wide, and about 1/2" thick.

Finally, I stick the whole thing in one of those black, heavy-duty binder clips.  The binder clip keeps the pad all folded up and makes it very easy to control.  And best of all, the handles mean you don't have to hold the sticky, varnish-soaked pad with your fingers.

This trick works best if the pad is just a little wider than the binder clip, so that the pad is supported by the clip along its full width.  If you want a wider pad than the one described, you can fold the paper towel differently and then use a couple of popsicle sticks to increase the effective width of the clip.

Don't Trust Your Tape Measure

Every once in a while on the woodworking forums there's a discussion about the problem of laying out and cutting parts accurately, and these talks typically tally time-tested tips like these:
  1. Be careful!
  2. Be sure to cut on the waste side of the line.
  3. Use a knife instead of a pencil for marking.
  4. Set up stop blocks for making repeated cuts.
  5. Use relative dimensioning where possible.
  6. Don't trust that sliding hook on the end of your tape measure.
  7. And so on.
Here's one more tip:  For really accurate work, don't trust your tape measure at all.  Period.

"Really?" you say.  Well, yes.  As it turns out, the machine that makes tape measures uses a rubber belt to print the markings on the tape.  This belt can stretch slightly during the process, and when it does, the marks it puts on the tape will be misplaced by however much the belt stretched.  This means that while a particular tape may be perfectly accurate at, say, the 12-inch mark and the 24-inch mark, it might be off by a noticeable amount halfway in between.

Whether this potential inaccuracy actually matters or not depends on what you're doing.  In any case, though, it's a good thing to be aware of and something to think about if you're having trouble.  For much more detailed information, click here.

Tuesday, April 12, 2011

Bandsaw Outfeed Table

When I first got a bandsaw, I thought I would use it mostly for cutting curves, and maybe once in a while for sawing small logs into boards. But pretty soon I figured out that it was every bit as useful as a ripping machine, especially with warped or twisted stock that would be just plain dangerous to cut on a table saw. So of course that meant I needed something to support longer boards as they came off the back of the bandsaw.

This is what I came up with. One end attaches firmly to the bandsaw table, while the other end sits on a single leg that's hinged so it will fold up for storage. A piece of clothesline rope keeps the leg from swinging out too far when the table is in use. I'm the first to admit that this arrangement looks pretty flimsy, but it is surprisingly stable when it's all set up.

To attach the outfeed table to the bandsaw, I started by bolting a piece of aluminum angle to the bandsaw table. The holes for the bolts were already drilled and tapped in the bandsaw table. The outfeed table then sits on the little shelf formed by the aluminum angle. It is held in place by two more bolts that go down from the top and through the angle.

When I made the outfeed table, I had to include a shim to bring its top surface up to the level of the bandsaw table. I also had to cut a couple of notches in the end of the outfeed table to clear the heads of the bolts that attach the angle to the bandsaw.

The length of the leg is adjustable to make it easy to level the outfeed table, regardless of how the floor slopes or doesn't slope. At one time I also used the outfeed table with a radial arm saw, and the adjustable leg accommodated the difference in height between the bandsaw table and that of the radial arm saw.

I have no idea what I was thinking when I made this hinge to attach the leg to the table. A metal one from the BORG would have been much, much simpler.