Overview
Five or six years ago I ran across an article
where some guy had melted down some empty plastic milk jugs and used the
material to make the head for a mallet. While I'm not exactly an
environmentalist, the cheapskate in me was attracted to the idea of making
something useful out of apparent trash, so I decided to try it myself.
I've been fooling with the process off and on since, and figure it's time to
add what I've learned to the existing folklore.
On the surface it's
all pretty simple. You melt a bunch of plastic scraps together, maybe
transfer the resulting blob into a mold, and let it cool. There's a
pretty good series of three YouTube videos that starts
here where a
gentleman named Randy Knapp shows how he does it, with what I consider to be
exceptional results.
Material Selection
The first
thing to figure out is what kind of plastic to use. From what I can
tell, the best candidate for doing all this at home is High Density
Polyethylene, or HDPE. You'll find plenty of it in your trash can.
It melts at a reasonably low temperature, and it won't give off a bunch of
toxic fumes when heated. You can easily identify HDPE by looking for a
triangular recycling symbol with the number 2 in it.
Unfortunately,
not all HDPE is the same. When heated, some variants form into a rubbery
sticky blob that has to be more or less forced into a particular shape.
Others become almost liquid so that they will settle by gravity alone to
completely fill whatever container they're in. The measure of this
"runniness when heated" quality is called the melt flow index, or MFI.
Wikipedia has lots more to say about it
here. If you
poke around on Dow Chemical's website, you'll
find a huge variation in the MFI (and other parameters, too) among their HDPE
products.
This brings up the question: Do you want material with a
high or low MFI? The answer depends on how you plan to cast the material
into the shape you want. One way, as shown in Randy's video, is to let
it cool in the same container you melted it in. In this case, a high MFI
is better because the HDPE will flow nicely into the container. Any
bubbles will (eventually) rise to the top, and with luck the result will be a
solid block of uniform material. Although Randy clamps a board over the
top of the material after it has started to cool, I haven't seen where this
has much benefit when cooling in the same container that was used for
melting.
As mentioned, HDPE with a lower MFI doesn't really
melt. Instead, it sort of softens into a rubbery, sticky blob. You
can deal with it, however, by manually kneading it and twisting it while hot
(You'll need gloves for sure!) to force out the bubbles, perhaps several times
as more and more material is added to the mix. Then when enough material
is ready, you can let it solidify in a mold with a lid that allows you to
apply clamping pressure to force the blob into the mold.
You'll
notice (and be disappointed) that the HDPE items in your trash can don't have
the MFI printed on them along with the recycling symbol. So, short of
heating it up and seeing how it behaves, how do you tell what you've
got? Here are a couple of hints based on what I've observed:
1.
The two common ways to make HDPE parts are blow molding and injection
molding. There's a good description of the differences between them
here. In general, the MFI of blow molded items like milk jugs, bottles, and
similar hollow, thin-walled containers will be lower than that of injection
molded items. You can expect, then, that milk jugs and bottles will
soften into the "sticky rubbery blob" state, and that material that was
originally injection molded will tend to settle by gravity into the container
it's melted in.
2. Among different samples of injection
molded material, those with the highest MFI will be the most flexible for a
given thickness. I say this based on my own observations, along with the
statement from the Wikipedia article mentioned earlier that "The plastics
engineer should choose a material with a melt index high enough that the
molten polymer can be easily formed into the article intended, but low enough
that the mechanical strength of the final article will be sufficient for its
use."
One last hint on material selection is to try to use as close
to the same material as you can in any given batch. It's tempting to
just throw together bits and pieces of whatever's lying around, but if you try
to mix material with different characteristics, you're much more likely to
have problems with voids, cracks, and places where two different kinds of
plastic don't fuse together properly.
Melting
When it's time to melt a batch of HDPE, about all you have to do
to get it ready is to make sure it's clean, then cut it up into pieces that
will fit in your melting container. If you have a bunch of really
odd-shaped items, it might be useful to shred them so they pack efficiently
into your container. But otherwise I don't think shredding has any
benefit.
You'll want to melt your plastic in an oven at about 350
degrees F. HDPE has very poor thermal conductivity, so if you're dealing
with thick blocks of material, it will take a long time for them to heat
throughout. Avoid the temptation to speed the process by raising the
oven temperature. If the oven gets too hot, the plastic will burn and
smoke and you'll get an icky brown layer on the surface of the material.
If
you're using plastic with a high melt flow index, it will be easy to see when
the material has become semi-liquid and started to flow into the pan.
But it's not so easy to tell when the bigger pieces have melted
completely. It's also not easy to tell when all the bubbles have risen
to the top and popped. For both of these reasons, it a good idea to let
the batch cook for a good long while before you let it cool and solidify.
Mold Options
As shown in Randy's video, a non-stick brownie pan works well if
you plan to cool the material in the same container you melt it in. The
non-stick surface and the sloped sides make it easy to remove the cooled
plastic from the pan.
However if you want to use low-MFI material,
you will need a mold that somehow allows you to clamp down on a lid to force
the plastic into the mold under pressure.
I prefer the high-MFI,
cool-in-the-melting-pan approach myself, but sometimes don't want to make a
whole brownie pan full. So I sort of went overboard and made this mold
where you can move one side to make blocks of various sizes:
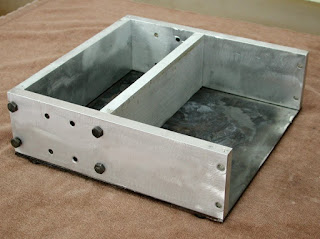
This thing just barely fits in my thrift shop toaster oven. It doesn't
have a non-stick coating or any draft to aid in removing the cast plastic, but
since it comes apart, this isn't a problem. Naturally, you have to plug
up the unused holes to prevent the plastic from leaking out. When I do find myself needing to compress some low-MFI material under pressure, I just cut a piece of plywood to match the current position of the moveable partition, and squish it down with C-clamps.
Working the Plastic
Once you have a nice block of HDPE, you'll be happy to discover
that you can work it with most any of your woodworking or metalworking
tools. In particular, it's a lot of fun to machine on a mill or a metal
lathe because you can remove material much faster than you would ever dream of
with metal.
About the only thing that doesn't work is
sandpaper. HDPE is pretty resistant to abrasion, and when you try to
sand it--especially by hand--nothing much happens.
My Projects
Here are some of the things I've made from recycled HDPE.

I made this extremely crude oscillating cylinder engine a few years back as an
exercise to see what I could do with the material. HDPE tends to be
slippery (sort of like Teflon), so it worked well for the engine's simple
bearings, piston action, and the seal between the wobbling cylinder and the
stationary upright. Unfortunately, over time the plastic parts warped
enough that the ending bound up too tight to run. (More on that under
"Limitations" below.)
These trunnions for the tilting table on a disk sander are another place
where HDPE's slipperiness made it easy to get a tight, low-friction fit between
two parts.
HTPE is waterproof, so it worked well for these replacement axles, bushings,
and wheels for a pool sweeper.

This replacement walker ski takes advantage of HDPE's abrasion
resistance. It and its mate have been in use for a couple of years and
show almost no sign of wear.
Limitations
Obviously,
you'll be limited in how big a piece of HDPE you can cast by the size of your
oven. What's less obvious is that it's difficult to make very thick
pieces. In my experiments, blocks more than about 1-1/2" thick almost
always have internal voids in them. These flaws are not round like bubbles
would be, but appear more like tears.
This is pure speculation on my
part, but here's what I think causes these voids. HDPE shrinks a lot when
it cools. (That's a fact.) Before it has a chance to solidify, this
shrinkage is relatively uniform throughout, and the block just gets
smaller. But since the block naturally cools from the outside in,
eventually the top, sides, and bottom solidify to make a rigid shell that
surrounds the still-molten material inside. Then as that material tries to
shrink within the rigid shell, something has to give and the inner material
basically tears itself apart.
Even if these internal voids don't
materialize, I believe that the cooling process creates internal stresses in the
material. These are what probably caused the warping over time of the
parts in my little wobbler engine. As it turns out, you can anneal the
material to help mitigate this problem. This website [] has more details
on that process.
One last problem is that most adhesives won't stick to it at all. I've
never had any luck trying to weld it, either. But bolts and nuts and
screws all work, so it is possible to fabricate items with multiple
parts if you don't mind using mechanical fasteners.


